라이브러리 소개
이번에는 C언어 또는 C++ 프로그램에서 이미지 파일을 다루는 데 유용한 stb 라이브러리에 대해 얘기해볼까 합니다. JPEG, PNG, TGA, BMP 등의 이미지 포맷을 지원하며, 각 픽셀의 256 컬러 RGB 값들이 저장되는 배열을 통해서 이미지 파일의 입출력이 가능합니다.
256 컬러 RGB는 간단히 말하자면 빛의 원색인 빨강 (Red), 녹색 (Green), 파랑 (Blue) 세 개의 가산혼합으로 각 픽셀에서 출력되는 색상을 결정하는 방식인데요. 각 원색의 세기를 0과 255사이의 숫자로 나타내기 때문에 256이라는 숫자가 등장합니다. 이는 16진법으로 썼을 때 두 자리수로 나타낼 수 있는 범위이고 원색이 3개이므로, 결과적으로 RGB 색상코드는 16진법으로 6자리 숫자가 되죠.
GitHub - nothings/stb: stb single-file public domain libraries for C/C++
stb single-file public domain libraries for C/C++. Contribute to nothings/stb development by creating an account on GitHub.
github.com
위에 링크된 Git 저장소로부터 라이브러리를 내려받을 수 있습니다. 대부분 기능은 헤더 파일을 포함시키기만 하면 사용할 수 있는데요. 주의할 점이 있다면, 단 하나의 소스파일에만 이를 포함시켜서 라이브러리가 중복으로 들어가는 것을 방지해야 한다는 것입니다.
리눅스, 유닉스, macOS를 사용하는 경우, 라이브러리를 다운로드 받은 위치를 C_INCLUDE_PATH 및 CPLUS_INCLUDE_PATH 환경변수들에 추가해주면 좋습니다. 이렇게 하면 소스코드를 작성하거나 컴파일을 할 때 경로를 지정해주지 않아도 되기 때문이죠. 비주얼 스튜디오의 경우 프로젝트 속성에서 헤더 파일의 디렉토리를 추가해 주거나, vcpkg를 통해서도 설치할 수 있다고 합니다. 윈도우에서 vcpkg를 통해 C언어 및 C++ 라이브러리들을 설치하고 관리하는 법에 대해서는 다음 포스팅을 참고하면 좋습니다.
vcpkg로 비주얼 스튜디오 라이브러리 설치하기
여기서는 vcpkg를 사용해서 라이브러리를 설치하고 이를 MS 비주얼 스튜디오에서 사용하는 법에 대해 알아봅시다. vcpkg는 C언어 및 C++ 라이브러리를 편리하게 관리할 수 있도록 도와주는 프로그램
swstar.tistory.com
이미지 입출력
stb 라이브러리를 이용해서 이미지 파일로부터 픽셀들에 대한 정보를 읽어들이는 방법에 대해 먼저 짚어봅시다. 이를 위해서는 다음과 같이 stb_image.h 헤더파일을 포함시켜야 합니다.
#define STB_IMAGE_IMPLEMENTATION
#include<stb_image.h>
만약 C++ 프로그램에서 사용하는 경우 extern "C" 코드블록 내에 포함시킬 필요가 있습니다. 그러면 stbi_load 함수를 호출하여 이미지 파일을 읽어들이는 게 가능해집니다. 이미지 파일을 읽어들이는 코드는 다음과 같은 구조를 가지고 있습니다.
// 읽어들일 이미지 파일의 이름
char filename_input[200];
strcpy(filename_input, "img_input.png");

// 가로방향 (이미지 폭)의 픽셀 갯수
int npix_width = 0;
// 세로방향 (이미지 높이)의 픽셀 갯수
int npix_height = 0;
// 각 픽셀에 저장된 컴포넌트의 갯수
int n_comp = 0;

// 이미지 파일을 읽어들입니다.
unsigned char *ptr_data_i =
    stbi_load(filename_input,
        &npix_width, &npix_height, &n_comp, 0);

/* ptr_data_i 배열에 저장된 데이터 사용
 * 행 (column) 루프 */
for (int ih = 0; ih < npix_height; ih++) {
    // 열 (row) 루프
    for (int iw = 0; iw < npix_width; iw++) {
        int index =
            n_comp * (ih * npix_width + iw);
        if (n_comp < 3) {
            // 흑백
            int grey =
                (int)ptr_data_i[index + 0];

            // 알파 채널
            int alpha;
            if (n_comp > 1) {
                int alpha =
                    (int)ptr_data_i[index + 1];
            } else {
                alpha = 255;
            }

            // ... gray 및 alpha 의 값 사용
        } else {
            // RGB 컬러
            int color_r =
                (int)ptr_data_i[index + 0];
            int color_g =
                (int)ptr_data_i[index + 1];
            int color_b =
                (int)ptr_data_i[index + 2];

            // 알파 채널
            int alpha;
            if (n_comp > 3) {
                int alpha =
                    (int)ptr_data_i[index + 3];
            } else {
                alpha = 255;
            }

            // ... color 및 alpha 의 값 사용
        }
    }
}

// ptr_data_i 포인터에 동적으로 할당된 메모리 해제
stbi_image_free(ptr_data_i);
가로방향 및 세로방향의 픽셀 수가 저장될 정수형 변수 npix_width 및 npix_height 가 먼저 선언되어 있습니다. stbi_load 함수가 이들의 포인터를 매개변수로 받은 다음, 이미지 파일에서 얻은 값들을 저장하게 되죠. 그리고 정수형 변수 n_comp 에 컴포넌트의 개수도 저장되는 것을 볼 수 있는데요. 4가지 경우에 따라 1에서 4사이의 값을 가지게 됩니다.
- n_comp = 1
흑백 (grey) - n_comp = 2
흑백 (grey) + 알파 (alpha) 채널
알파 채널은 투명 또는 반투명 효과를 구현하는데 주로 사용됩니다. - n_comp = 3
컬러 (RGB) - n_comp = 4
컬러 (RGB) + 알파 (alpha) 채널
이미지 파일을 제대로 읽었다면 ptr_data_i 포인터에 메모리가 동적으로 할당되고, 그 배열에 이미지의 정보가 저장됩니다. 이 때 2차원 평면의 이미지를 1차원 배열에 저장하기 때문에, 배열의 데이터에 접근하는 방식에 있어서 주의할 필요가 있는데요. 만약 컴포넌트의 개수가 3개라면, ptr_data_i[0], ptr_data_i[1], ptr_data_i[2] 에 첫번째 픽셀의 R, G, B 값들이 각각 저장됩니다. 그리고 ptr_data_i[3], ptr_data_i[4], ptr_data_i[5] 에 두번째 픽셀의 정보가 저장되고, 계속 이어집니다.
픽셀들이 1차원적으로 나열되는 방식은 페이지에 글자가 나열되는 것과 비슷합니다. 이미지의 맨 왼쪽, 맨 위에 있는 픽셀이 첫번째가 되고, 맨 윗줄을 따라가다가 첫번째 줄의 마지막 픽셀 다음에 두번째 줄의 첫번째 픽셀이 나열되는 방식입니다. 결과적으로 컴포넌트의 개수가 n_comp 인 경우에, 이미지의 ih-번째 행 및 iw-번째 열에 위치한 픽셀에 대한 정보는 다음과 같이 얻을 수 있습니다.
- R (빨강) 값
= ptr_data_i[n_comp * (ih * npix_width + iw) + 0] - G (녹색) 값
= ptr_data_i[n_comp * (ih * npix_width + iw) + 1] - B (파랑) 값
= ptr_data_i[n_comp * (ih * npix_width + iw) + 2] - 알파 값 (n_comp = 4 인 경우)
= ptr_data_i[n_comp * (ih * npix_width + iw) + 3]
그렇게 해서 정수형으로 형변환을 해 주면 0 에서 255 사이의 RGB 값들을 얻을 수 있습니다.
이미지 파일을 출력하기 위해서는 stb_image_write.h 헤더파일을 포함시켜야 합니다.
#define STB_IMAGE_WRITE_IMPLEMENTATION
#include<stb_image_write.h>
이 때는 출력하고자 하는 이미지 파일의 포맷에 따라서 그에 맞는 함수를 호출해야 합니다.
- JPEG
stbi_write_jpg - PNG
stbi_write_png - TGA
stbi_write_tga - BMP
stbi_write_bmp
/* 이미지 출력을 위한 포인터 및
 * 동적 메모리 할당 */
unsigned char *ptr_data_o =
    (unsigned char *)malloc(n_comp *
        npix_width * npix_height *
        sizeof(unsigned char));

/* ptr_data_o 배열에 데이터 입력
 * 행 (column) 루프 */
for (int ih = 0; ih < npix_height; ih++) {
    // 열 (row) 루프
    for (int iw = 0; iw < npix_width; iw++) {
        int index =
            n_comp * (ih * npix_width + iw);
        if (n_comp < 3) {
            // 흑백
            int grey = 127;

            // 배열의 값 지정
            ptr_data_o[index + 0] =
            	(unsigned char)grey;
            if (n_comp > 1) {
                // 알파 채널
                int alpha = 255;
                ptr_data_o[index + 1] =
                    (unsigned char)alpha;
            }
        } else {
            /* RGB 컬러
             * 여기서는 빨강 */
            int color_r = 255;
            int color_g = 0;
            int color_b = 0;

            // 배열의 값 지정
            ptr_data_o[index + 0] =
            	(unsigned char)color_r;
            ptr_data_o[index + 1] =
            	(unsigned char)color_g;
            ptr_data_o[index + 2] =
            	(unsigned char)color_b;
            if (n_comp > 3) {
                // 알파 채널
                int alpha = 255;
                ptr_data_o[index + 3] =
                    (unsigned char)alpha;
            }
        }
    }
}

// PNG 이미지 파일 출력
int exported_img =
    stbi_write_png(filename_output,
        npix_width, npix_height, n_comp,
        ptr_data_o, 0);

// 동적으로 할당된 메모리 해제
free(ptr_data_o);
이미지 입력과는 반대로, 이미지에 대한 정보를 배열에 먼저 저장한 다음 이미지를 출력하는 함수를 호출하도록 합니다.
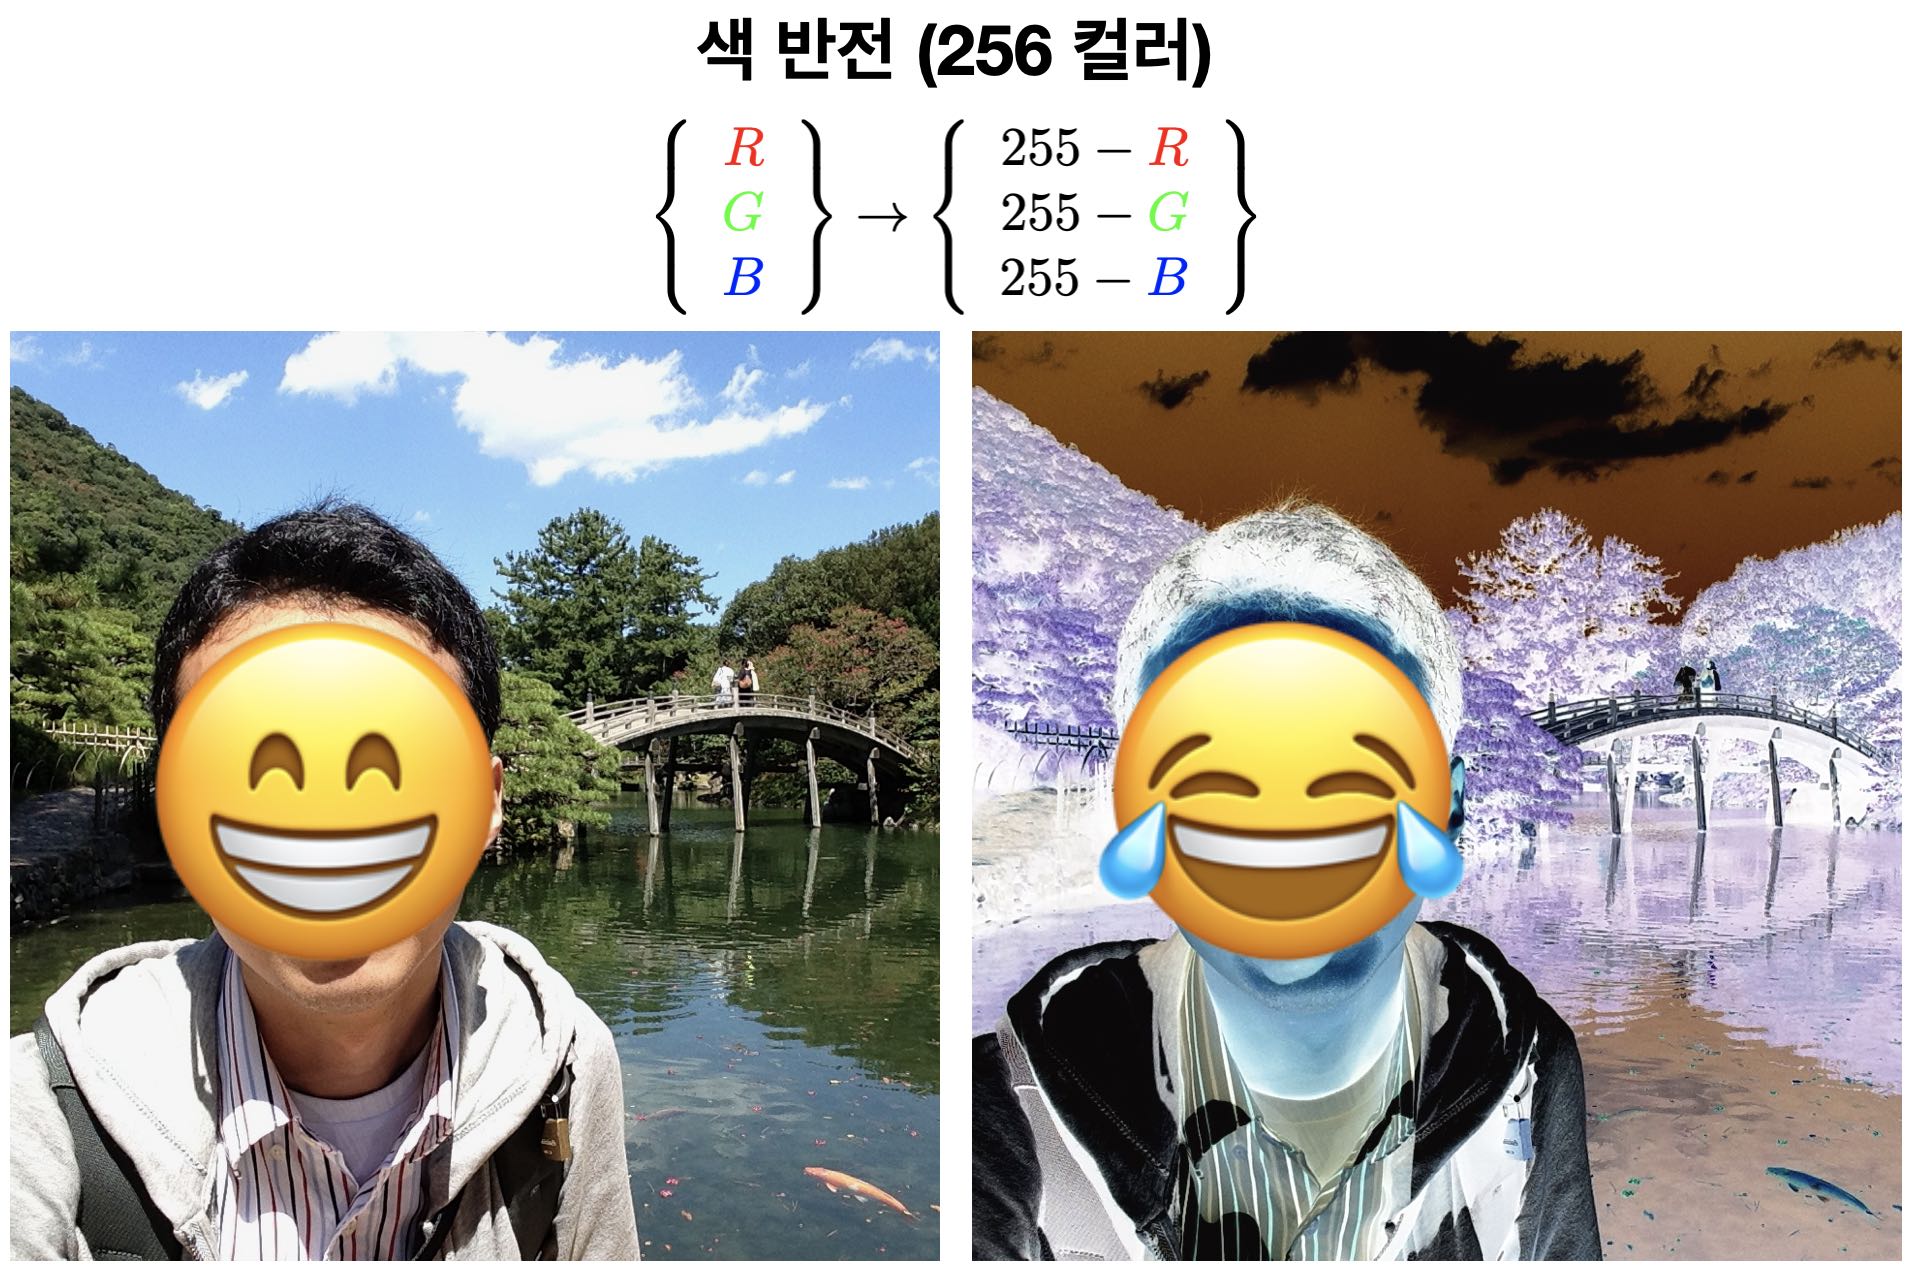
예시 : 색 반전
stb 라이브러리를 사용하는 예시로서 색 반전 프로그램을 소개해 봅니다. 256 컬러의 경우, 255에서 RGB 값들을 각각 빼면 반전된 색상의 RGB 값들을 구할 수 있는데요. 예를 들어서 빨간색의 경우 RGB 값이 255,0,0 에 해당되고, 앞에 언급된 대로 이를 반전시키면 0,255,255 라는 RGB 값이 나옵니다. 이는 밝은 청록색에 해당되죠.
test1_color_inversion_stb.cpp [다운로드]
#include<stdio.h>
#include<stdlib.h>
#include<string.h>

// include stb header files
extern "C" {
  #define STB_IMAGE_IMPLEMENTATION
  #include<stb_image.h>
  #define STB_IMAGE_WRITE_IMPLEMENTATION
  #include<stb_image_write.h>
}

#define NCHAR_NAME 200

int main(int argc, char *argv[]) {
    /* If the input file is not specified,
     * we cannot run the program. */
    if (argc < 2) {
        fprintf(stderr,
            "ERROR : please have input file.\n");

        return 0;
    }

    char filename_input[NCHAR_NAME];
    char filename_output[NCHAR_NAME];

    /* set names of input and output files
     * from command-line arguments */
    strcpy(filename_input, argv[1]);
    if (argc >= 3) {
        strcpy(filename_output, argv[2]);
    } else {
        strcpy(filename_output, "output.png");
    }

    // number of pixel in width
    int npix_width = 0;
    // number of pixel in height
    int npix_height = 0;
    // number of component in the PNG file
    int n_comp = 0;

    // read the input image
    unsigned char *ptr_data_i =
        stbi_load(filename_input,
            &npix_width, &npix_height, &n_comp, 0);

    // terminate if the input file was not properly read
    if (ptr_data_i == NULL) {
        fprintf(stderr,
            "ERROR : failure in loading image.\n");

        return 0;
    }

    fprintf(stdout, "  input image : %s\n", filename_input);
    fprintf(stdout,
        "    number of pixel in width : %d\n", npix_width);
    fprintf(stdout,
        "    number of pixel in height : %d\n", npix_height);
    fprintf(stdout,
        "    number of components : %d\n", n_comp);

    // array for the output image
    unsigned char *ptr_data_o =
        (unsigned char *)malloc(n_comp *
            npix_width * npix_height * sizeof(unsigned char));

    // loop over column
    for (int ih = 0; ih < npix_height; ih++) {
        // loop over row
        for (int iw = 0; iw < npix_width; iw++) {
            int index = n_comp * (ih * npix_width + iw);
            if (n_comp < 3) {
                // color inversion
                int grey = 255 - (int)ptr_data_i[index + 0];

                ptr_data_o[index + 0] = (unsigned char)grey;
                if (n_comp > 1) {
                    ptr_data_o[index + 1] = ptr_data_i[index + 1];
                }
            } else {
                // color inversion
                int color_r = 255 - (int)ptr_data_i[index + 0];
                int color_g = 255 - (int)ptr_data_i[index + 1];
                int color_b = 255 - (int)ptr_data_i[index + 2];

                ptr_data_o[index + 0] = (unsigned char)color_r;
                ptr_data_o[index + 1] = (unsigned char)color_g;
                ptr_data_o[index + 2] = (unsigned char)color_b;
                if (n_comp > 3) {
                    ptr_data_o[index + 3] = ptr_data_i[index + 3];
                }
            }
        }
    }

    // write the output PNG image
    fprintf(stdout, "  output image : %s\n", filename_output);
    int exported_img =
        stbi_write_png(filename_output,
            npix_width, npix_height, n_comp,
            ptr_data_o, 0);

    if (exported_img == 0) {
        fprintf(stderr,
            "ERROR : failure in writing image.\n");
    }

    stbi_image_free(ptr_data_i);
    free(ptr_data_o);

    return 0;
}
소스파일을 컴파일 한 다음 입력파일과 출력파일의 이름을 명령행 인자로 주면, 색 반전이 된 이미지 파일을 얻을 수 있습니다.
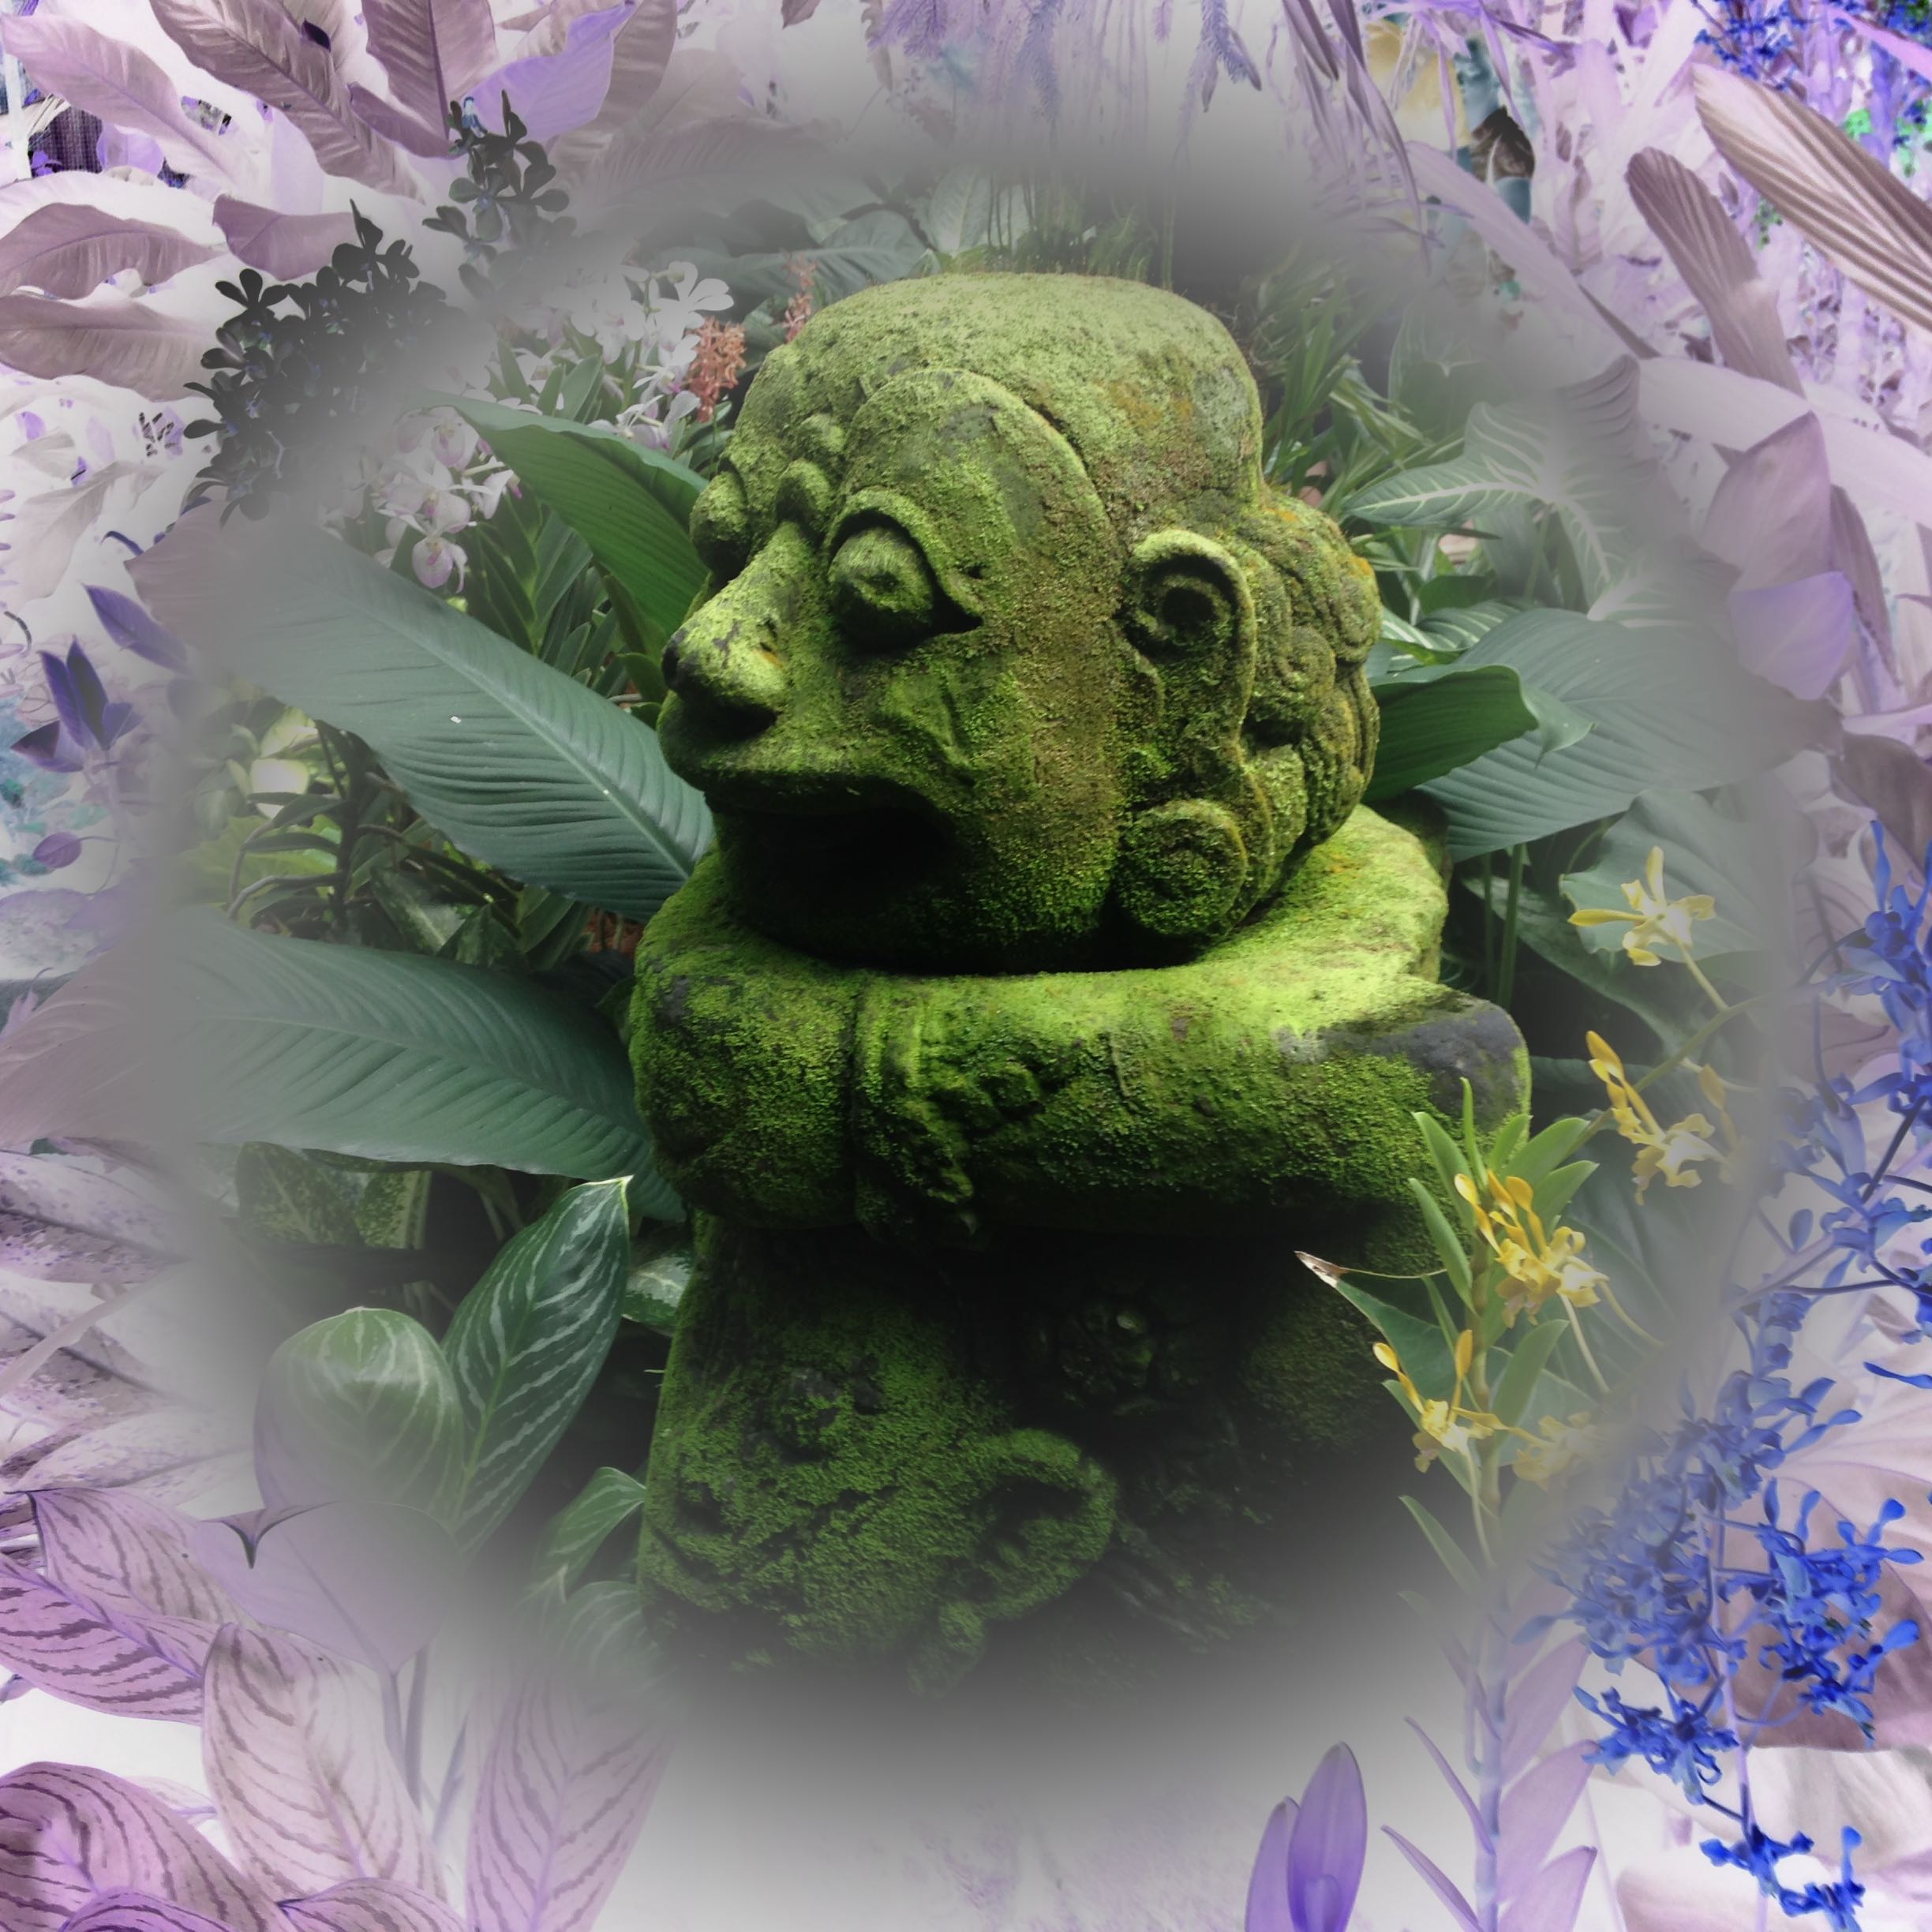
이걸 응용하면 더 재미있는 이미지도 만들어 볼 수 있습니다. 예컨대 특정 구역에만 색 반전을 해 볼수도 있죠. 예전에 싱가포르 국립 난초 정원 (National Orchid Garden)에 방문했을때 찍었던 사진을 먼저 편집해 봤습니다.
픽사베이에 예쁜 연꽃 사진이 있길래, 이것도 다른 방법으로 색 반전을 해봤습니다.
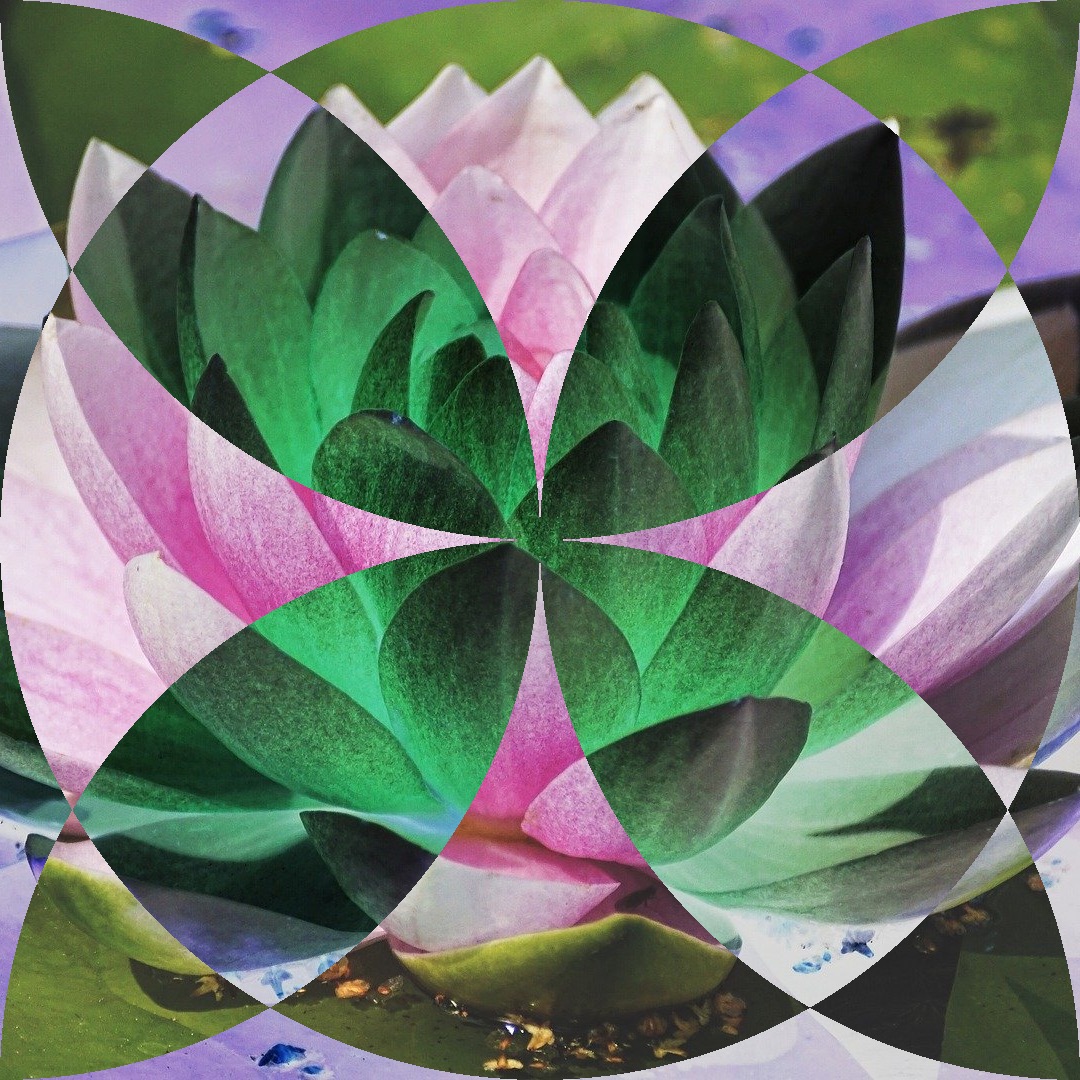
원본 이미지 출처 : pixabay
(image by suju-foto)
이 라이브러리를 이용한 이미지 편집을 통해서, 오랫만에 프로필 사진도 바꿨네요. 이미지 입출력 기능을 사용해서 바탕화면 이미지도 몇 개 만들어 봤습니다.
자작 바탕화면 이미지 모음 - 아시아 테마
컴퓨터로 이미지 편집하는 법을 좀 배운김에, 바탕화면을 몇 개 만들어 봤습니다. 제가 그동안 여행하면서 찍은 사진들을 가지고 컴퓨터 배경화면을 만들어 보고 있는데, 여기서는 아시아 테마
swstar.tistory.com


